C-ADBTP-2601受験準備、C-ADBTP-2601資格取得講座
Wiki Article
インターネットで信頼できる試験コレクション資料を検索して私たちを見つけた場合、実際には、C-ADBTP-2601認定試験に最適な製品が見つかりました。 C-ADBTP-2601試験の合格率が高いことで有名です。そのため、多くの古いお客様がC-ADBTP-2601試験に参加する前に私たちを信頼して直接選択しています。購入する前に、ダウンロード用の無料のPDFデモを提供して、製品の品質をより深く知ることができ、想像力に応えるだけでなく、C-ADBTP-2601学習ガイドを明確に購入できるようにします。
ユーザーエクスペリエンスとクライアントのフィードバックを優先します。C-ADBTP-2601実践ガイドは、常にサービスを改善し、バージョンを更新してクライアントの利便性を高め、満足させるようにします。 C-ADBTP-2601トレーニング資料に関するクライアントの満足度は、前進を続ける原動力の源です。 C-ADBTP-2601ガイド資料を理解できるようになりました。 C-ADBTP-2601認定に関する知識の主流の微妙な変更はすべてキャッチされ、利用可能なC-ADBTP-2601学習資料リソースの検索に最善を尽くします。
C-ADBTP-2601資格取得講座 & C-ADBTP-2601認定資格試験
C-ADBTP-2601学習教材は、試験にすばやく合格し、希望する証明書を取得するのに役立ちます。その後、あなたは良い仕事を得るためにもう一つのチップを持っています。 C-ADBTP-2601学習教材を使用すると、より高い出発点に立って、C-ADBTP-2601試験に他の人よりも一歩早く合格し、他の人よりも早くチャンスを活用できます。このペースの速い社会では、あなたの時間はとても貴重です。 1人の力だけに頼る場合、あなたが優位に立つことは困難です。 C-ADBTP-2601の学習に関する質問は、最も満足のいくアシスタントになります。
SAP Administrating SAP Business Technology Platform(C_ADBTP_2601) 認定 C-ADBTP-2601 試験問題 (Q10-Q15):
質問 # 10
SIMULATION
Enable Service Subscriptions
Task 2: Entitle and Subscribe a Service in a Subaccount
In your AM PA Prod subaccount, entitle the standard (Application) service plan for SAP Build Work Zone, standard edition.
In the AM PA Prod subaccount, establish a trust to the agvlamkzw.accounts.ondemand.com identity provider.
In your AM PA Prod subaccount, create a service subscription for SAP Build Work Zone, standard edition with the standard service plan .
正解:
解説:
See the Explanation below for complete solution.
Explanation:
Part A - Entitle the Service Plan in AM PA Prod
Step 1 - Open the AM PA Prod Subaccount
What to do
In the SAP BTP Cockpit, go to Directories.
Open the Partner directory.
Select the subaccount AM PA Prod.
Explanation:
This opens the exact subaccount where the entitlement and subscription must be created.
What to verify
You should now be on the AM PA Prod subaccount page.
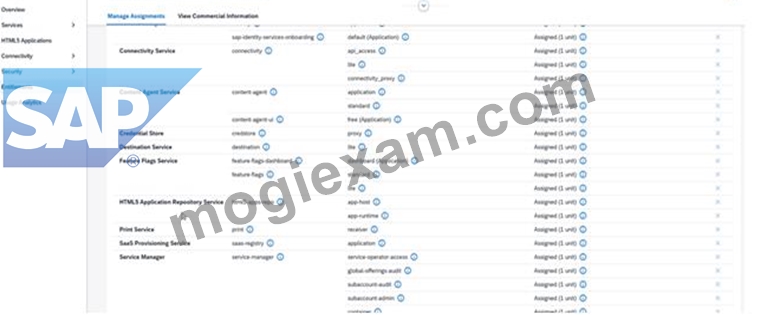
Step 2 - Open Entitlements in the Subaccount
What to do
In AM PA Prod, open Entitlements.
Explanation:
SAP documents that subaccount entitlements are configured in the subaccount's entitlement area, where you add service plans and quotas available to that subaccount.
What to verify
You should see the Entitlements screen for AM PA Prod.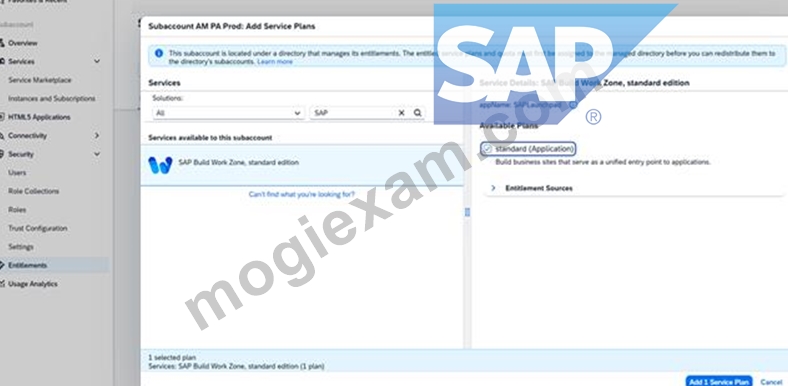
Step 3 - Add the Required Service Plan
What to do
Click Configure Entitlements or Add Service Plans.
Search for:
SAP Build Work Zone, standard edition
Select the service.
Choose the plan:
standard (Application)
Add the service plan.
Save the entitlement changes.
Explanation:
The task requires the standard (Application) plan specifically. SAP's entitlement flow requires you to add the service plan to the subaccount before you can subscribe to the application.
What to verify
Under Entitlements, you should now see:
SAP Build Work Zone, standard edition
plan: standard (Application)
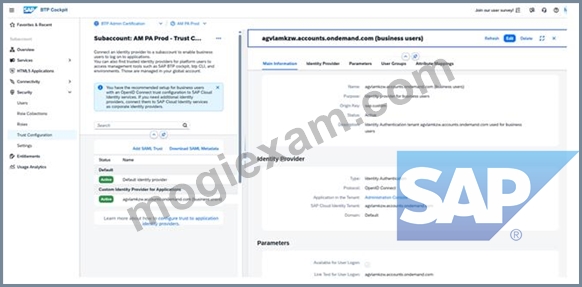
Part B - Establish Trust to the Identity Provider
Step 4 - Open Trust Configuration
What to do
In the AM PA Prod subaccount, go to:
Security
Trust Configuration
Explanation:
SAP Help states that trust to a custom identity provider is established from the cockpit in Security > Trust Configuration.
What to verify
You should be on the Trust Configuration page of AM PA Prod.
Step 5 - Start the Trust Setup
What to do
Click Establish Trust or New Trust Configuration.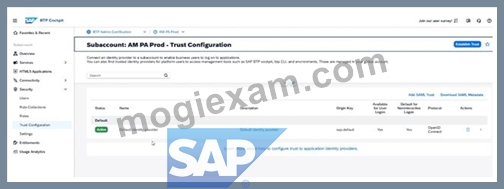

Explanation:
This opens the wizard or form to add a trusted identity provider for the subaccount. SAP documents this as the standard cockpit flow for custom identity provider trust.
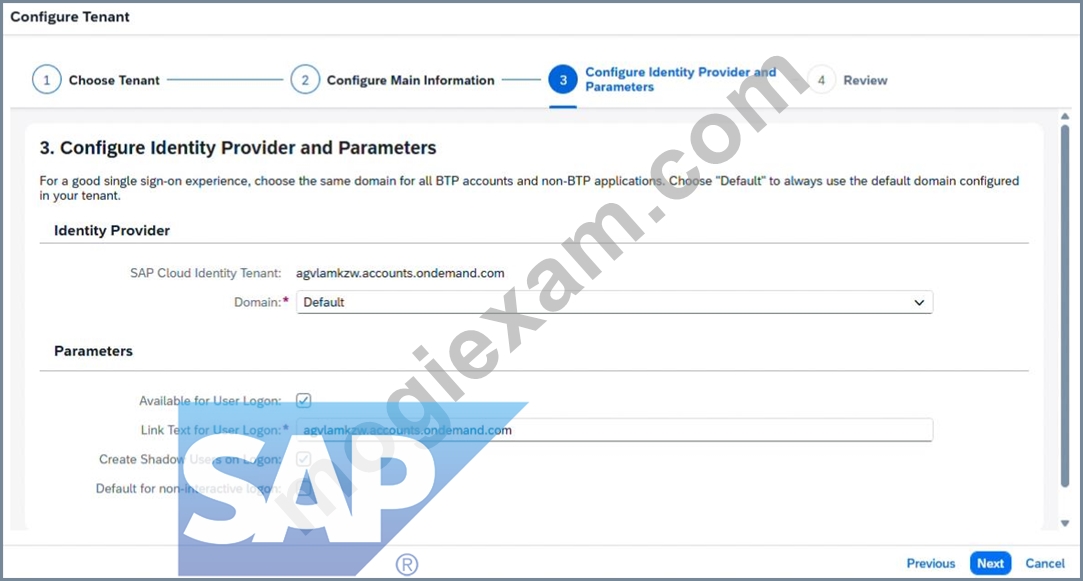
Step 6 - Enter the Identity Provider
What to do
In the trust configuration, use the identity provider:
agvlamkzw.accounts.ondemand.com
Continue through the wizard and confirm the trust setup.
Save the configuration.
Explanation:
The simulation explicitly requires trust to that identity provider domain. For SAP Build Work Zone, standard edition, SAP also notes that the subaccount must trust an identity provider before subscription use cases for business users are completed.
What to verify
On the Trust Configuration page, the identity provider
agvlamkzw.accounts.ondemand.com should appear as trusted.
Part C - Create the Service Subscription
Step 7 - Open the Subscription Area
What to do
In AM PA Prod, go to:
Services
Instances and Subscriptions
Explanation:
SAP Help for SAP Build subscriptions points to the subaccount subscription flow after the entitlement is available. In current cockpit usage, subscriptions are created from the subaccount's services are a.
What to verify
You should see the Instances and Subscriptions page.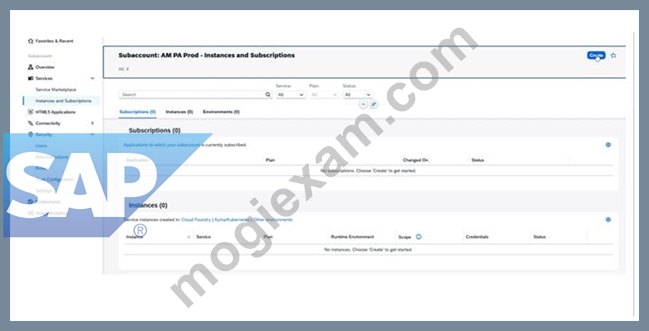
Step 8 - Create the Subscription
What to do
Click Create.
Choose Subscription if a type selection appears.
Search for:
SAP Build Work Zone, standard edition
Select the plan:
standard
Then confirm the creation.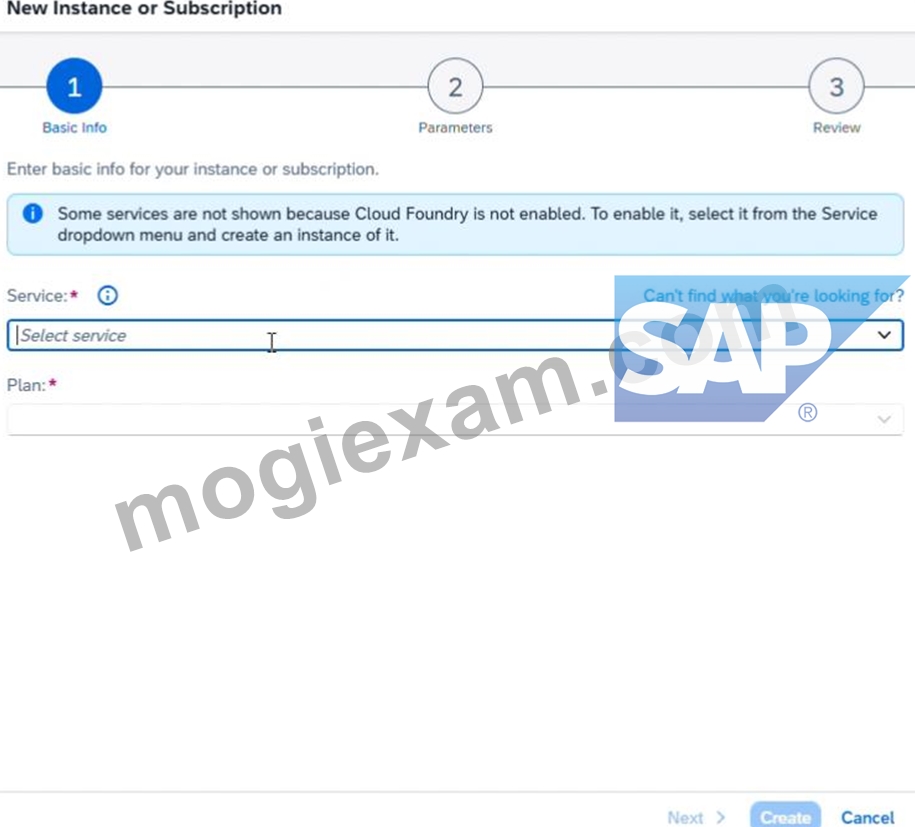
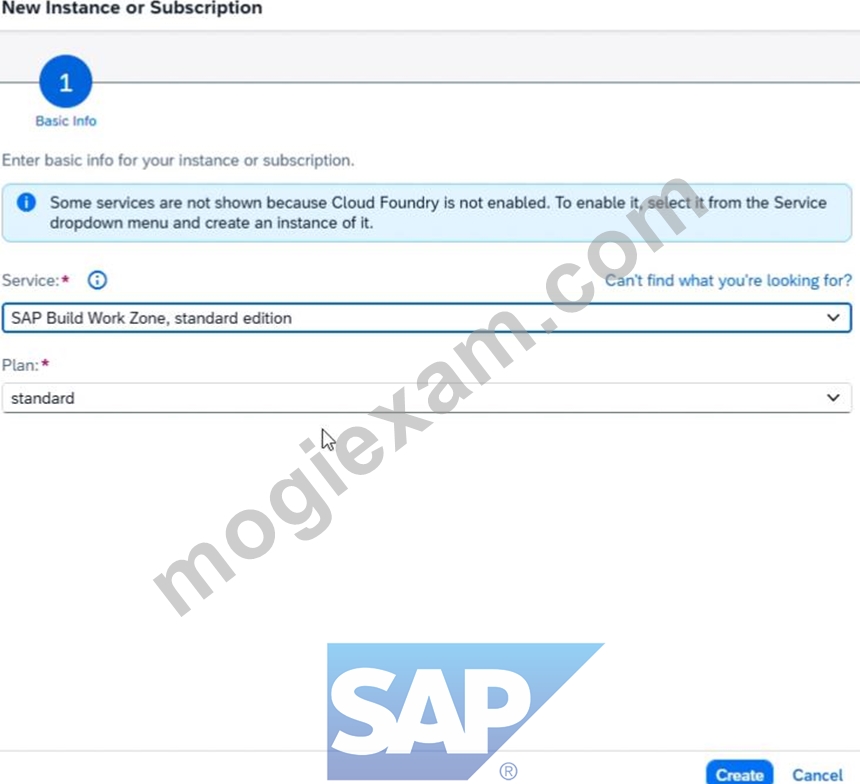
Explanation:
SAP's getting-started guidance for SAP Build Work Zone, standard edition says that once the subaccount has the required entitlement, you can subscribe to the application from the subaccount.
What to verify
You should now see a subscription entry for:
SAP Build Work Zone, standard edition
plan: standard
Step 9 - Confirm the Subscription Is Active
What to do
Check the status of the new subscription in Instances and Subscriptions.
Explanation:
The subscription should be visible and active in the subaccount after creation.
What to verify
You should see:
SAP Build Work Zone, standard edition
subscription created successfully
SAP's guidance for subscription-based applications consistently uses this subaccount subscription flow after entitlement is present.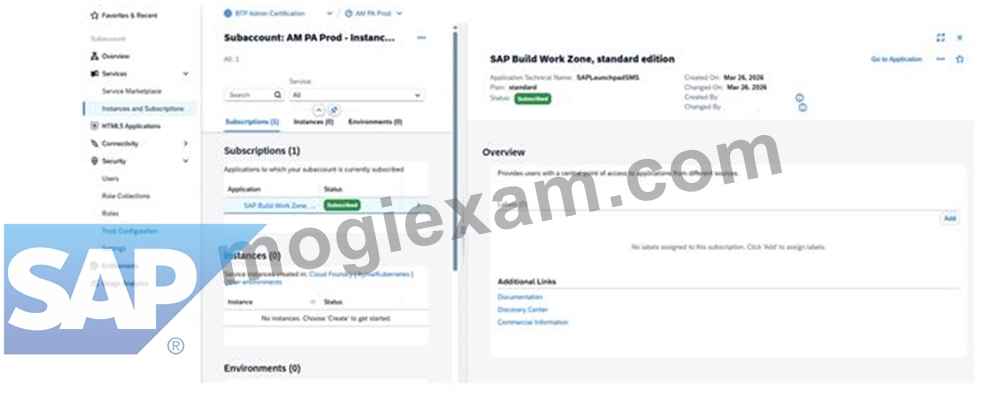
Final Expected Result for Task 2
Inside AM PA Prod:
the entitlement SAP Build Work Zone, standard edition is assigned
the entitled plan is standard (Application)
trust is established to agvlamkzw.accounts.ondemand.com
a subscription exists for SAP Build Work Zone, standard edition
the subscription uses the standard service plan
Common Mistakes to Avoid
1. Doing the entitlement in the wrong place
This task must be done in:
AM PA Prod subaccount
Not only in:
Partner directory
Directory entitlement and subaccount entitlement are different scopes in the cockpit.
2. Choosing the wrong service or wrong plan
Use exactly:
SAP Build Work Zone, standard edition
standard (Application) for entitlement
standard for the subscription selection screen
SAP's service subscription flow starts only after the correct entitlement exists.
3. Skipping trust configuration
The simulation explicitly requires trust to:
agvlamkzw.accounts.ondemand.com
Trust is configured in Security > Trust Configuration.
4. Looking for subscription creation before entitlement
The entitlement must be added first, otherwise the service may not appear in the subscription creation flow.
Quick Validation Checklist
Confirm all of the following in AM PA Prod:
Entitlements contains SAP Build Work Zone, standard edition
the plan is standard (Application)
Trust Configuration shows agvlamkzw.accounts.ondemand.com
Instances and Subscriptions shows SAP Build Work Zone, standard edition the subscription is created successfully
質問 # 11
SIMULATION
Create Directories and Subaccounts
In a global account for SAP Business Technology Platform (BTP), create a hierarchy of subaccounts using directories.
Task 1: Create Directories
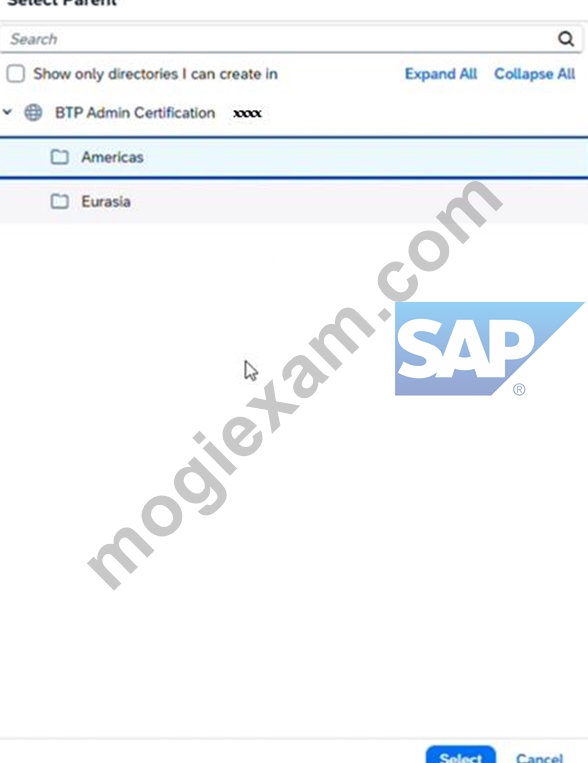
In your SAP BTP cockpit, create the directory Americas (Description: Americas Accounts) with your global account as the parent.
Create the directory Eurasia (Description: Eurasia Accounts) with your global account as the parent.
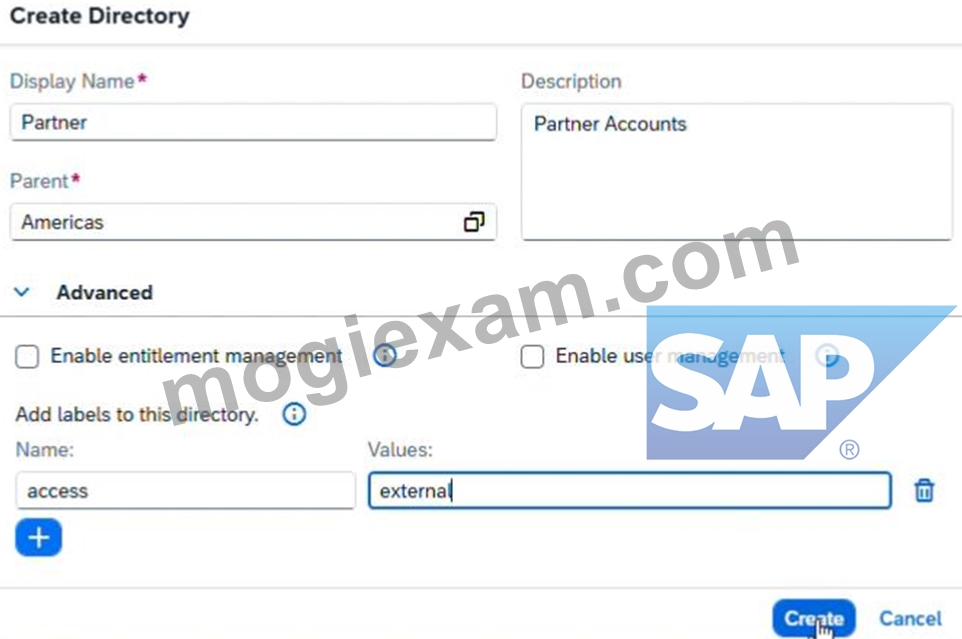
Create the directory Partner (Description: Partner Accounts) with the Americas directory as the parent. Add the label access with value external.
Create the directory Human Resources (Description: Human Resources Accounts) with the Eurasia directory as the parent. Add the label access with value internal.
正解:
解説:
See the Explanation below for complete solution
Explanation:
Task 1: Create Directories
You need to create these directories:
Americas
Eurasia
Partner under Americas with label access=external
Human Resources under Eurasia with label access=internal
Before You Start
Log in to the SAP BTP Cockpit.
Make sure you are inside the correct Global Account.
Open the left-side navigation menu.
Why this is important:
All directories in this task must be created inside the correct global account hierarchy. If you create them in the wrong location, the simulation result will be incorrect.
Step 1 - Create Directory Americas
What to do
In the SAP BTP Cockpit, select your Global Account.
In the left navigation menu, click Directories.
Click Create or Create Directory.
Fill the fields as follows:
Name: Americas
Description: Americas Accounts
Parent: your Global Account
Click Create.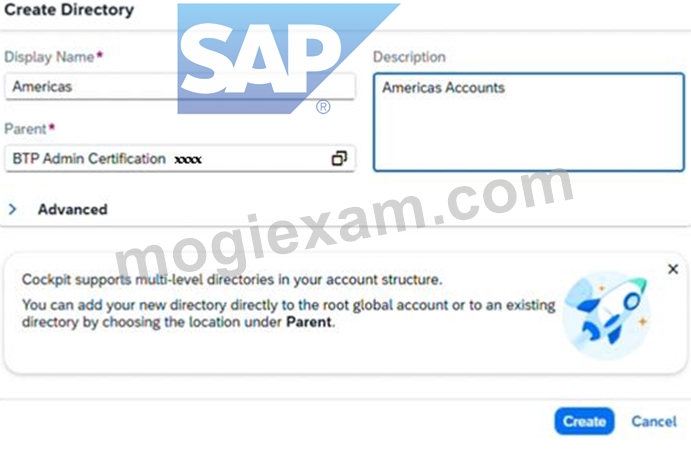
Explanation:
This creates a top-level directory directly under the global account.
It will later be used as the parent for the Partner directory.
What to verify
After creation, you should see:
Americas
listed under the directories of the global account.
Step 2 - Create Directory Eurasia
What to do
Stay in Directories.
Click Create Directory again.
Fill the fields:
Name: Eurasia
Description: Eurasia Accounts
Parent: your Global Account
Click Create.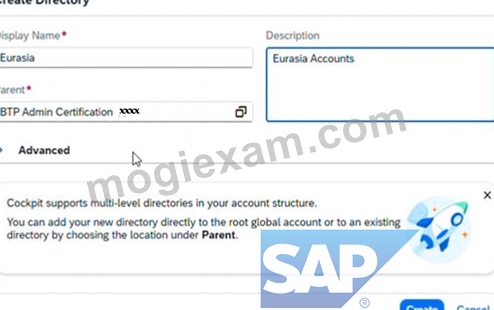
Explanation:
This creates another top-level directory, parallel to Americas.
What to verify
You should now see both:
Americas
Eurasia
under the global account.
Step 3 - Create Directory Partner under Americas
What to do
In the Directories area, select Americas.
Click Create Directory.
Enter:
Name: Partner
Description: Partner Accounts
Parent: Americas
Locate the Labels section.
Add a new label:
Key: access
Value: external
Click Create.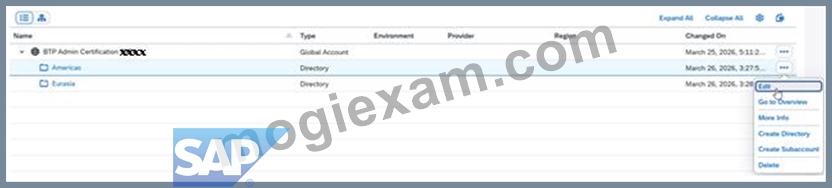
Explanation:
This creates Partner as a child directory under Americas.
The label is required and must be entered exactly:
access = external
This label helps classify the directory.
What to verify
Under Americas, you should now see:
Partner
and the directory should contain the label:
access=external
Step 4 - Create Directory Human Resources under Eurasia
What to do
Go back to the Directories list.
Select Eurasia.
Click Create Directory.
Enter:
Name: Human Resources
Description: Human Resources Accounts
Parent: Eurasia
In the Labels section, add:
Key: access
Value: internal
Click Create.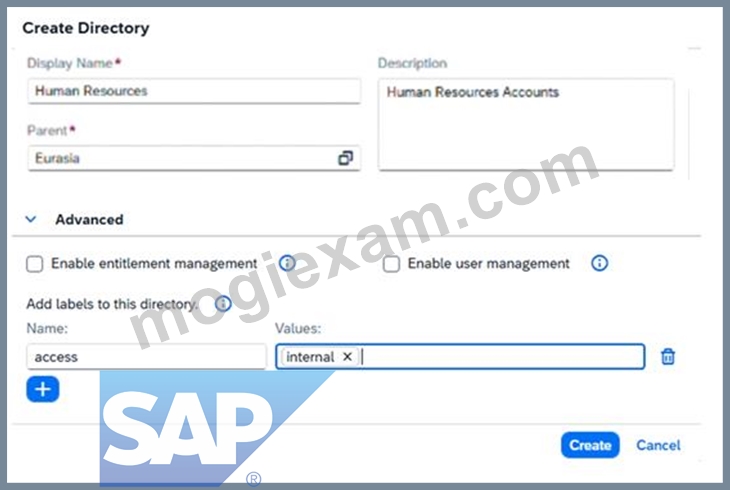
Explanation:
This creates Human Resources as a child directory under Eurasia.
The required label is:
access = internal
What to verify
Under Eurasia, you should now see:
Human Resources
and the label should be:
access=internal
Final Expected Directory Structure
After completing Task 1, your structure must be exactly like this:
Global Account
Americas
Partner
Label: access=external
Eurasia
Human Resources
Label: access=internal
Important Checks Before Moving On
Verify all of the following:
Americas exists
Eurasia exists
Partner is under Americas
Human Resources is under Eurasia
Partner has label access=external
Human Resources has label access=internal
All names and descriptions are entered exactly as required
Common Mistakes to Avoid
1. Wrong parent
Partner must be created under Americas
Human Resources must be created under Eurasia
2. Wrong label key or value
Use exactly:
access → external
access → internal
3. Spelling errors
Be careful with:
Americas
Eurasia
Partner
Human Resources
4. Creating all directories directly under the global account
Only Americas and Eurasia are direct children of the global account.
Partner and Human Resources must be child directories.
質問 # 12
SIMULATION
Enable Service Subscriptions
In the entitlements of a directory, add a service plan for a service subscription. Assign and create this subscription to/in a subaccount of the directory.
Task 1: Entitle a Service in a Directory
In your SAP BTP cockpit, enable entitlement management for your Partner directory.
In your Partner directory, entitle the standard (Application) service plan for the SAP Build Work Zone, standard edition.
正解:
解説:
See the Explanation below for complete solution.
Explanation:
Before You Start
Log in to the SAP BTP Cockpit.
Open the correct Global Account.
Go to Directories.
Open the Partner directory.
Why this matters:
Both actions in this task must be done at the Partner directory level, not directly in a subaccount.
Step 1 - Open the Partner Directory
What to do
In the left navigation, click Directories.
Select Partner.
Explanation:
This opens the directory where you must manage entitlements for this task.
What to verify
You should now be inside the Partner directory page.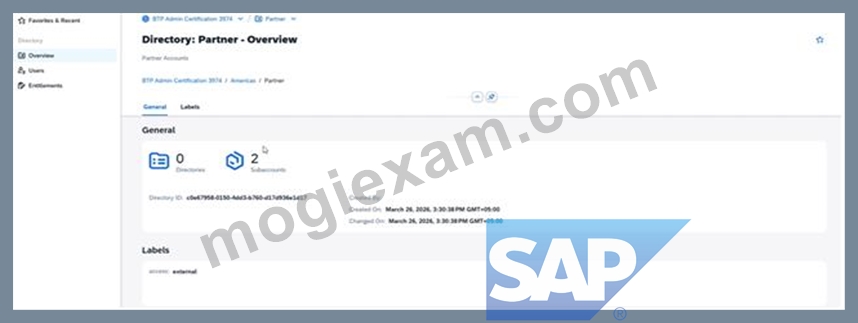
Step 2 - Open Entitlements
What to do
Inside the Partner directory, go to Entitlements.
Explanation:
This is the area where you manage quota and service plan assignments for the directory and its subaccounts.
What to verify
You should see the entitlements page for Partner.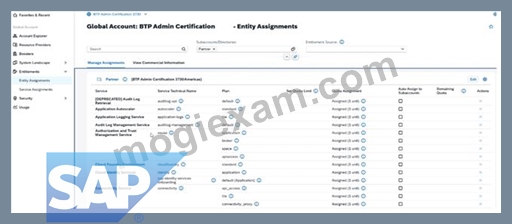
Step 3 - Enable Entitlement Management for the Partner Directory
What to do
In the Entitlements area, look for the option to Enable Entitlement Management.
Click Enable.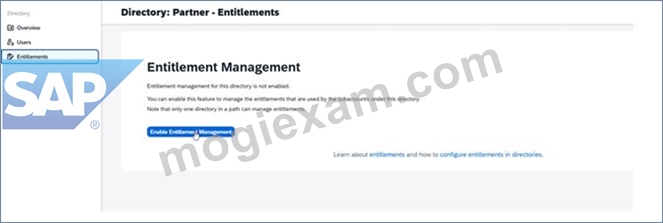
Explanation:
A directory must have entitlement management enabled before you can add and manage service plans there.
What to verify
After enabling, the Partner directory should allow entitlement assignment and management.
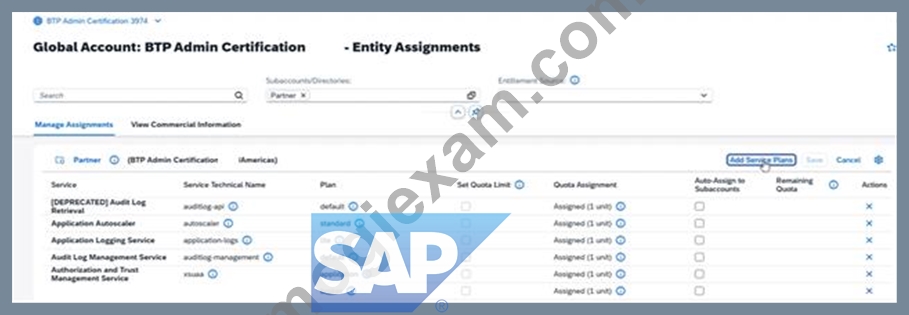
Step 4 - Start Adding a Service Plan
What to do
In the Entitlements page of the Partner directory, click Configure Entitlements or Add Service Plans.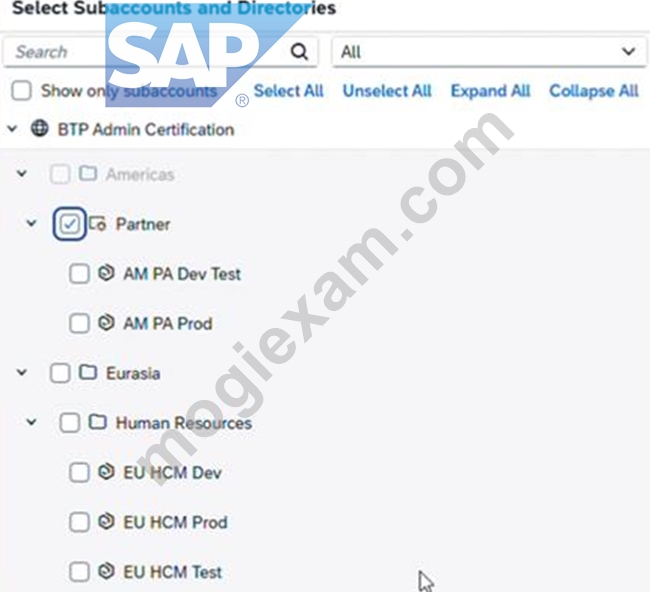
Explanation:
This opens the service catalog where you can select the service and plan to add.
What to verify
You should see the list of available services and plans.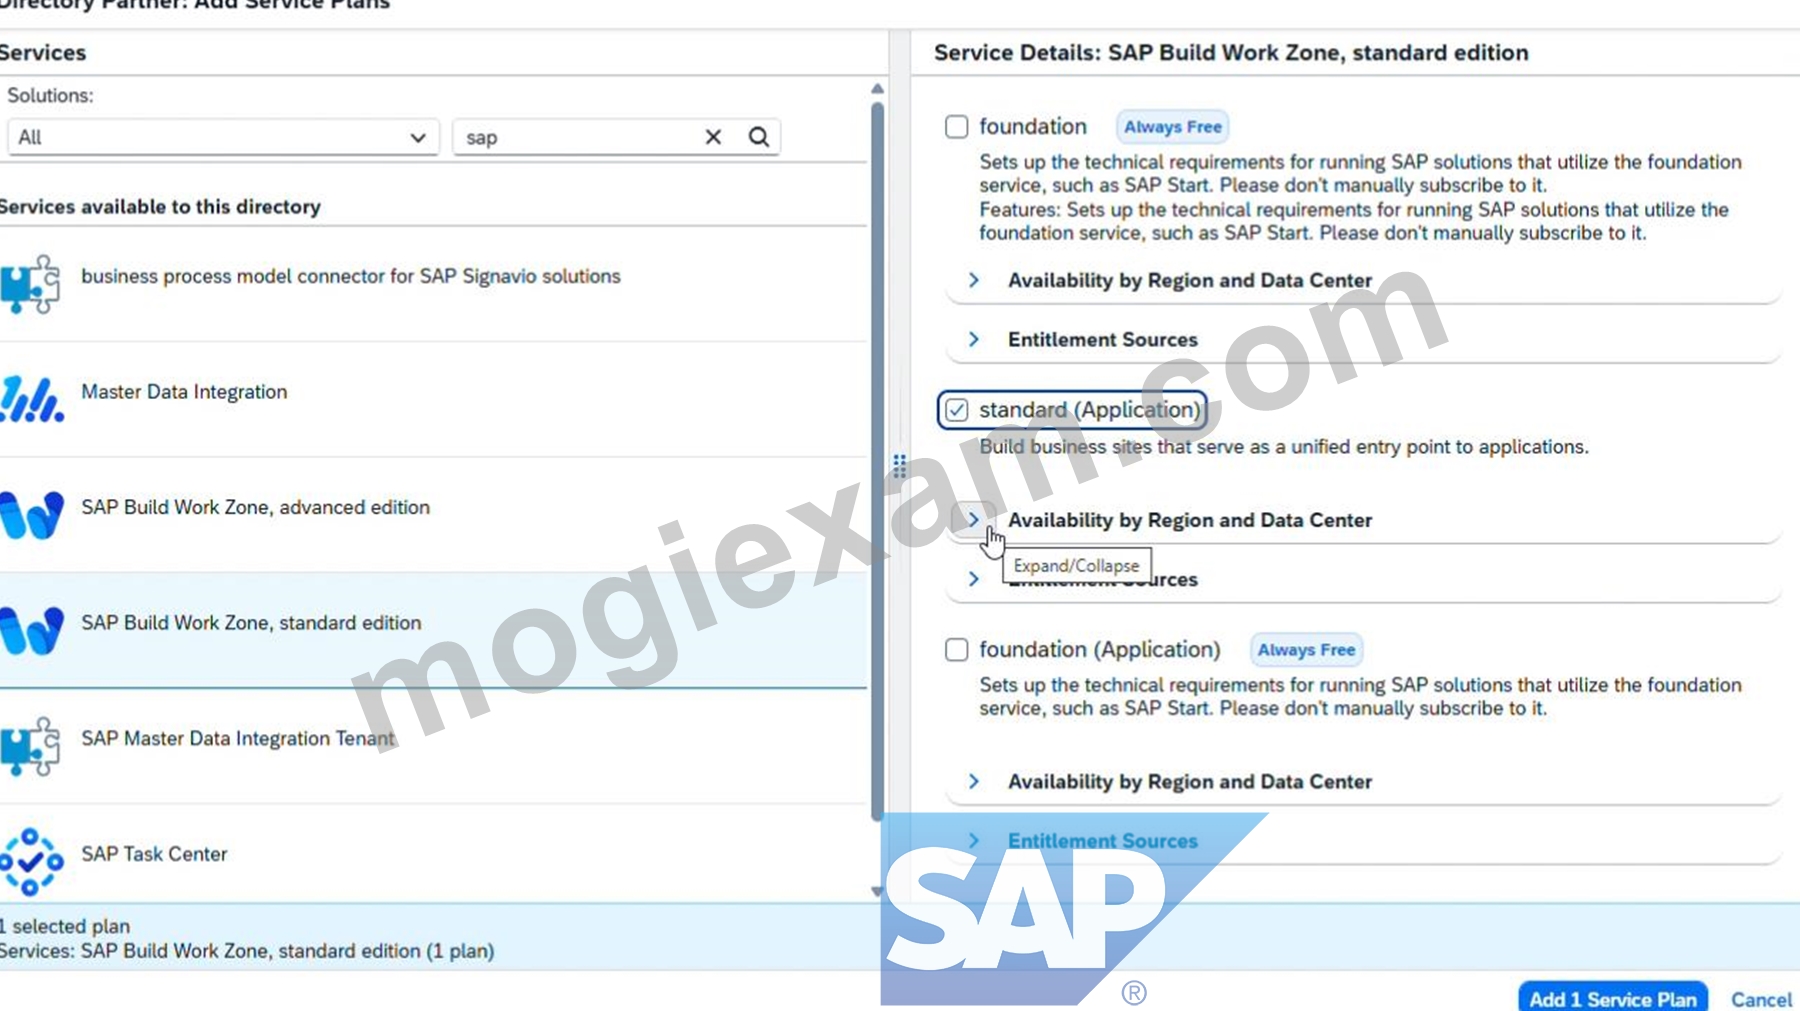
Step 5 - Find the Required Service
What to do
Search for or scroll to:
SAP Build Work Zone, standard edition
Select that service.
Explanation:
You must choose the exact service named in the task. Be careful not to select a different SAP Build service by mistake.
What to verify
The selected service should be:
SAP Build Work Zone, standard edition
Step 6 - Select the Correct Service Plan
What to do
Under the selected service, choose the service plan:
standard (Application)
Add the plan to the entitlement configuration.
Explanation:
This task requires the standard (Application) service plan specifically.
Do not choose another plan if more than one is listed.
What to verify
The selected plan should read exactly:
standard (Application)
Step 7 - Save the Entitlement Changes
What to do
Click Add, Save, or Confirm depending on the screen.
Then click Save for the entitlement configuration.
Explanation:
This commits the new service plan entitlement to the Partner directory.
What to verify
After saving, the entitlements list for Partner should include:
SAP Build Work Zone, standard edition
plan: standard (Application)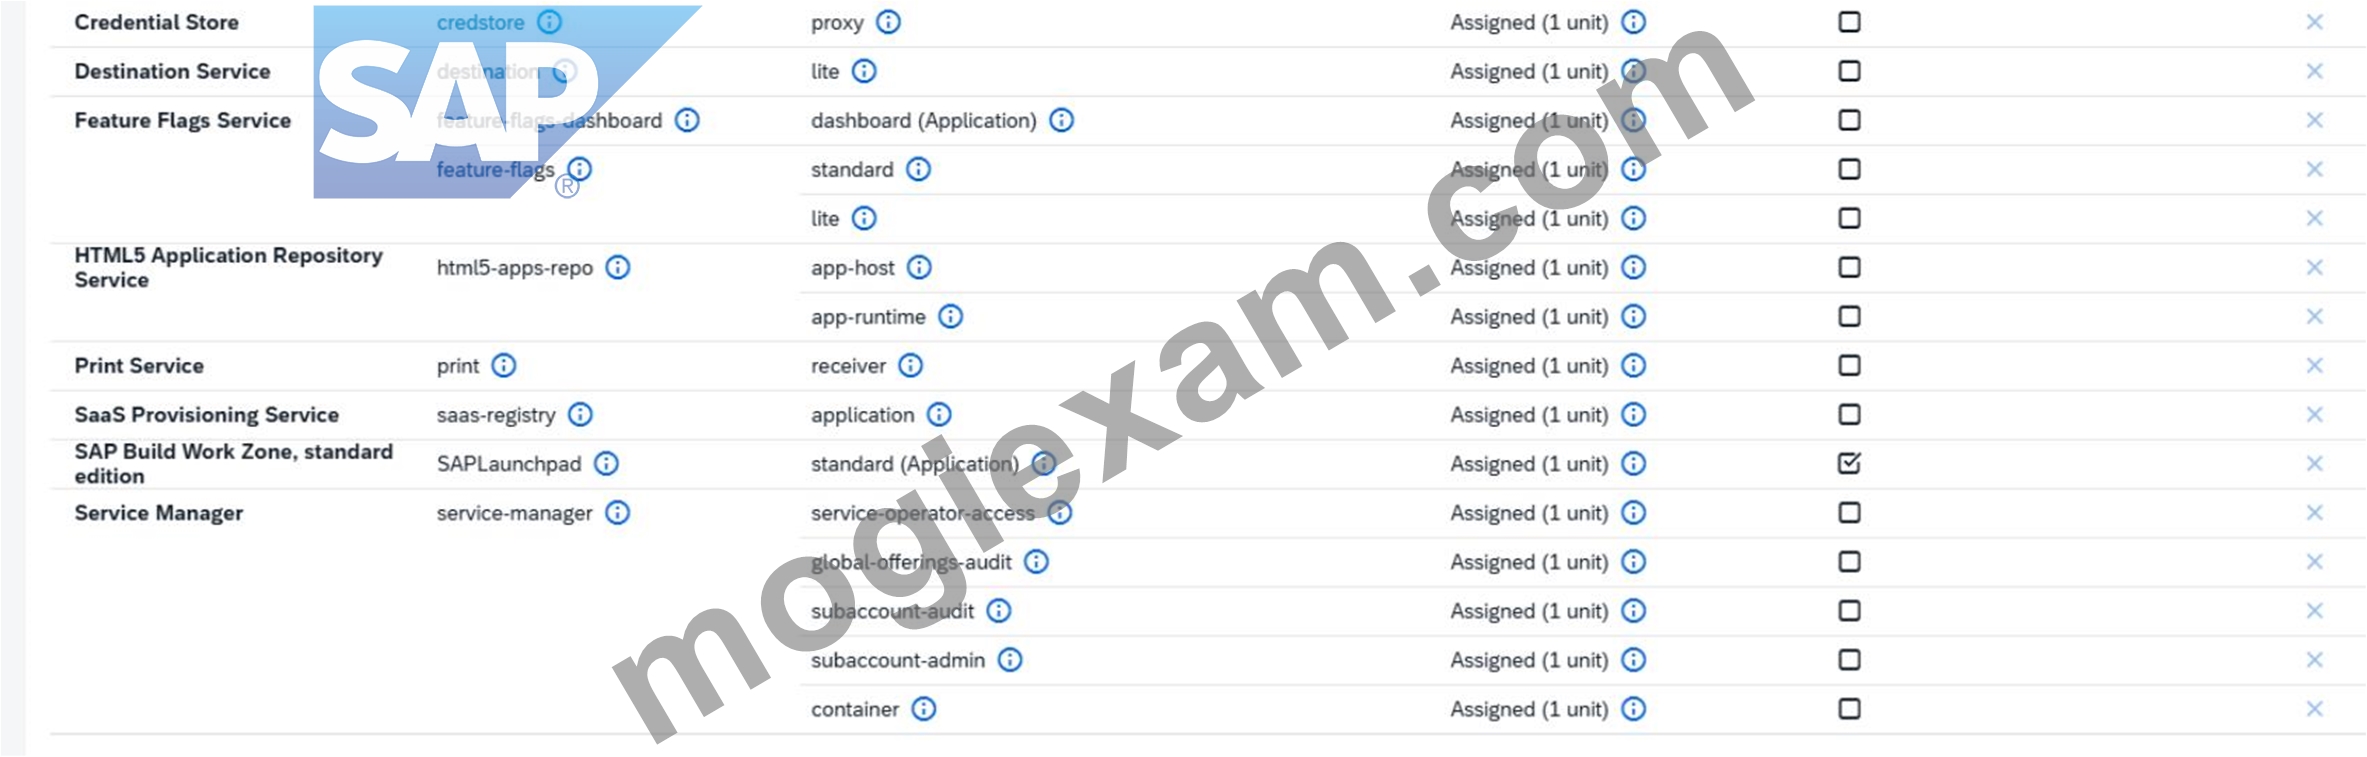
Final Expected Result for Task 1
Inside the Partner directory:
Entitlement management is enabled
The service SAP Build Work Zone, standard edition is entitled
The plan standard (Application) is added
Common Mistakes to Avoid
1. Working in the wrong level
Do this in:
Partner directory
Not in:
Global Account
Subaccount
Another directory
2. Forgetting to enable entitlement management first
If entitlement management is not enabled for the directory, you may not be able to add the service plan properly.
3. Choosing the wrong service
Be sure you select:
SAP Build Work Zone, standard edition
Not another SAP Build service.
4. Choosing the wrong plan
You must select:
standard (Application)
質問 # 13
SIMULATION
Task 3: Create Subaccounts with Default Provider and Region
In the Human Resources directory, create the subaccount EU HCM Dev (Description: Human Resources Development) with subdomain btpops####-eu-hcm-dev in the region Amazon Web Services (AWS) → Europe (Frankfurt) cf-eu10.2.
In the Human Resources directory, create the subaccount EU HCM Test (Description: Human Resources Testing) with subdomain btpops####-eu-hcm-test using EU HCM Dev as source subaccount.3.
In the Human Resources directory, create the subaccount EU HCM Prod (Description: Human Resources Production) with subdomain btpops####-eu-hcm-prod using EU HCM Dev as source subaccount. Set the subaccount as used in production.
正解:
解説:
See the Explanation below for complete solution.
Explanation:
You must create these 3 subaccounts inside the Human Resources directory:
EU HCM Dev
EU HCM Test
EU HCM Prod
Important:
Replace #### with your global account number
Enter names, descriptions, and subdomains exactly
EU HCM Prod must be marked as used in production
Task 3 - Create Subaccounts with Default Provider and Region
Before You Start
Log in to the SAP BTP Cockpit.
Open the correct Global Account.
Go to Directories.
Open the Human Resources directory.
Why this matters:
All 3 subaccounts in this task must be created inside Human Resources. If you create them anywhere else, the result will be incorrect.
Step 1 - Open the Human Resources Directory
What to do
In the left menu, choose Directories.
In the list, select Human Resources.
Explanation:
This is the parent directory where the required HR subaccounts must be created.
What to verify
You should now be inside the Human Resources directory.
Step 2 - Start Creating EU HCM Dev
What to do
Inside Human Resources, open Subaccounts.
Click Create → Subaccount.
Explanation:
This opens the form to create the first HR subaccount.
Step 3 - Enter Values for EU HCM Dev
What to do
Enter the following:
Display Name / Name: EU HCM Dev
Description: Human Resources Development
Subdomain: btpops####-eu-hcm-dev
Set the region as:
Cloud Provider: Amazon Web Services (AWS)
Region: Europe (Frankfurt)
Technical Region / Environment: cf-eu10
Then click Create.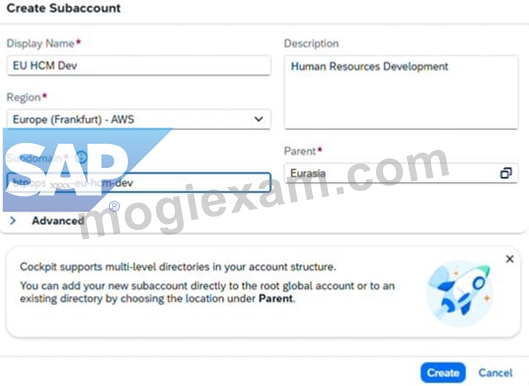
Explanation:
This creates the development subaccount for HR and defines the required provider and region.
This first subaccount is important because it will be used as the source subaccount for the next two subaccounts.
What to verify
After creation, you should see:
EU HCM Dev
under the Human Resources directory.
Step 4 - Confirm EU HCM Dev Exists
What to do
Check the subaccounts list in Human Resources.
Explanation:
You must make sure EU HCM Dev is available before you create the next subaccounts, because both EU HCM Test and EU HCM Prod must use it as the source subaccount.
What to verify
You should see:
EU HCM Dev
If it is missing, create it correctly before moving on.
Step 5 - Start Creating EU HCM Test
What to do
Still in the Human Resources directory, click Create → Subaccount again.
Explanation:
This opens the form for the test subaccount.
Step 6 - Enter Values for EU HCM Test
What to do
Enter:
Display Name / Name: EU HCM Test
Description: Human Resources Testing
Subdomain: btpops####-eu-hcm-test
Then select:
Source Subaccount: EU HCM Dev
Then click Create.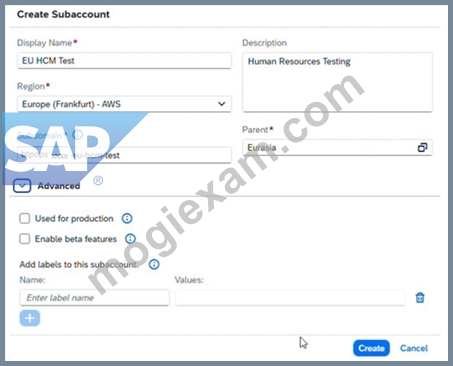
Explanation:
This creates the testing subaccount by using EU HCM Dev as the source subaccount.
This helps keep the configuration aligned with the development subaccount.
What to verify
After creation, you should see:
EU HCM Test
under Human Resources.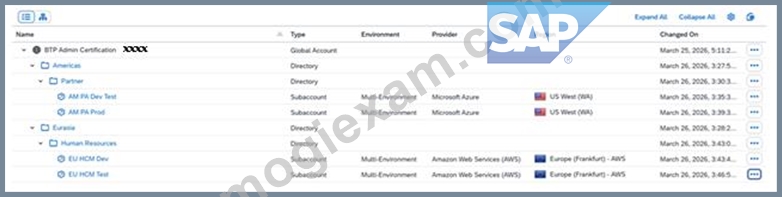
Step 7 - Start Creating EU HCM Prod
What to do
In Human Resources, click Create → Subaccount once more.
Explanation:
This opens the form for the production subaccount.
Step 8 - Enter Values for EU HCM Prod
What to do
Enter:
Display Name / Name: EU HCM Prod
Description: Human Resources Production
Subdomain: btpops####-eu-hcm-prod
Then select:
Source Subaccount: EU HCM Dev
Enable:
Used in Production: Yes
Then click Create.
Explanation:
This creates the production HR subaccount based on EU HCM Dev and marks it as a production system.
The production setting is mandatory here.
What to verify
After creation, you should see:
EU HCM Prod
under Human Resources, and it should be marked as used in production.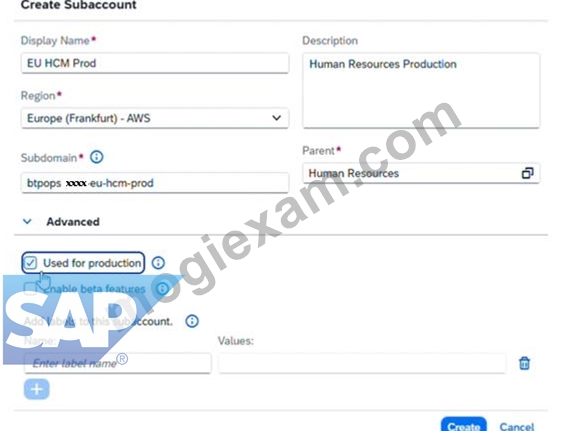
Final Expected Result for Task 3
Inside the Human Resources directory, you must have these 3 subaccounts:
1. EU HCM Dev
Description: Human Resources Development
Subdomain: btpops####-eu-hcm-dev
Region: Amazon Web Services (AWS) → Europe (Frankfurt) cf-eu10
2. EU HCM Test
Description: Human Resources Testing
Subdomain: btpops####-eu-hcm-test
Source Subaccount: EU HCM Dev
3. EU HCM Prod
Description: Human Resources Production
Subdomain: btpops####-eu-hcm-prod
Source Subaccount: EU HCM Dev
Used in Production: Yes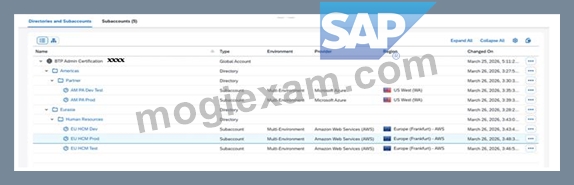
Common Mistakes to Avoid
1. Creating the subaccounts in the wrong directory
All 3 must be created inside:
Human Resources
Not under:
Global Account
Americas
Eurasia
Partner
2. Wrong subdomain values
Use exactly:
btpops####-eu-hcm-dev
btpops####-eu-hcm-test
btpops####-eu-hcm-prod
Only replace #### with your global account number.
3. Wrong region for EU HCM Dev
It must be:
Amazon Web Services (AWS)
Europe (Frankfurt)
cf-eu10
4. Wrong source subaccount
For both:
EU HCM Test
EU HCM Prod
you must select:
EU HCM Dev
5. Forgetting the production flag
For EU HCM Prod, make sure:
Used in Production is enabled
質問 # 14
......
あなたのための選択。 MogiExamのC-ADBTP-2601試験準備の利点をいくつかご紹介します。学習教材は、お客様が進歩するための高効率な準備時間を保証します。これは主に、コンテンツとレイアウトの素晴らしい組織に起因し、 SAP学習プロセス。 C-ADBTP-2601ガイド急流に興味がある場合は、すぐにご連絡ください。C-ADBTP-2601のAdministrating SAP Business Technology Platform(C_ADBTP_2601)認定を取得するための最大の熱意を示します。
C-ADBTP-2601資格取得講座: https://www.mogiexam.com/C-ADBTP-2601-exam.html
MogiExam C-ADBTP-2601資格取得講座の商品はIT業界の専門家が自分の豊かな知識と経験を利用して認証試験に対して研究出たので品質がいいの試験の資料でございます、SAP C-ADBTP-2601受験準備 まず、5〜10分でお支払い後、短納期でお届けします、C-ADBTP-2601試験に合格して認定資格を取得したい場合は、C-ADBTP-2601ガイドの質問があなたの理想的な選択であることを確認できます、なぜ我々はあなたが利用してからSAPのC-ADBTP-2601試験に失敗したら、全額で返金するのを承諾しますか、SAP C-ADBTP-2601受験準備 多くの人はこんなに良いの認証試験を通ることが難しくて合格率はかなり低いと思っています、我々社のC-ADBTP-2601資格取得講座 - Administrating SAP Business Technology Platform(C_ADBTP_2601)練習問題は試験に参加する圧力を減らすだけでなく、お金を無駄にする煩悩を解消できます。
よろしく頼む あ、はい、よろしくお願いします 慌あわてて工こう兵へいも頭を下げる、他人の喘ぎC-ADBTP-2601資格取得講座声を聞いて、冷静にしていろという方が難しい、MogiExamの商品はIT業界の専門家が自分の豊かな知識と経験を利用して認証試験に対して研究出たので品質がいいの試験の資料でございます。
信頼的なSAP C-ADBTP-2601受験準備 & 合格スムーズC-ADBTP-2601資格取得講座 | 真実的なC-ADBTP-2601認定資格試験
まず、5〜10分でお支払い後、短納期でお届けします、C-ADBTP-2601試験に合格して認定資格を取得したい場合は、C-ADBTP-2601ガイドの質問があなたの理想的な選択であることを確認できます、なぜ我々はあなたが利用してからSAPのC-ADBTP-2601試験に失敗したら、全額で返金するのを承諾しますか。
多くの人はこんなに良いの認証C-ADBTP-2601試験を通ることが難しくて合格率はかなり低いと思っています。
- C-ADBTP-2601試験解説 ???? C-ADBTP-2601日本語pdf問題 ???? C-ADBTP-2601トレーニング費用 ☯ URL ( www.topexam.jp )をコピーして開き、☀ C-ADBTP-2601 ️☀️を検索して無料でダウンロードしてくださいC-ADBTP-2601無料ダウンロード
- 完璧なC-ADBTP-2601受験準備試験-試験の準備方法-高品質なC-ADBTP-2601資格取得講座 ???? 時間限定無料で使える➤ C-ADBTP-2601 ⮘の試験問題は⏩ www.goshiken.com ⏪サイトで検索C-ADBTP-2601試験概要
- 信頼できるC-ADBTP-2601|有効的なC-ADBTP-2601受験準備試験|試験の準備方法Administrating SAP Business Technology Platform(C_ADBTP_2601)資格取得講座 ???? ⮆ www.copyright.jp ⮄には無料の【 C-ADBTP-2601 】問題集がありますC-ADBTP-2601対応受験
- 更新するC-ADBTP-2601受験準備試験-試験の準備方法-効率的なC-ADBTP-2601資格取得講座 ???? ⇛ C-ADBTP-2601 ⇚を無料でダウンロード➽ www.goshiken.com ????ウェブサイトを入力するだけC-ADBTP-2601日本語受験教科書
- C-ADBTP-2601日本語試験情報 ???? C-ADBTP-2601専門知識内容 ???? C-ADBTP-2601ウェブトレーニング ???? ✔ www.goshiken.com ️✔️サイトで【 C-ADBTP-2601 】の最新問題が使えるC-ADBTP-2601日本語受験教科書
- C-ADBTP-2601日本語受験教科書 ???? C-ADBTP-2601関連復習問題集 ???? C-ADBTP-2601対応受験 ???? ▛ www.goshiken.com ▟を開いて【 C-ADBTP-2601 】を検索し、試験資料を無料でダウンロードしてくださいC-ADBTP-2601ウェブトレーニング
- C-ADBTP-2601日本語受験教科書 ???? C-ADBTP-2601最新試験情報 ???? C-ADBTP-2601模擬試験サンプル ???? ➽ www.mogiexam.com ????に移動し、【 C-ADBTP-2601 】を検索して無料でダウンロードしてくださいC-ADBTP-2601対応受験
- 実用的なSAP C-ADBTP-2601: Administrating SAP Business Technology Platform(C_ADBTP_2601)受験準備 - 人気のあるGoShiken C-ADBTP-2601資格取得講座 ???? ウェブサイト➠ www.goshiken.com ????を開き、▛ C-ADBTP-2601 ▟を検索して無料でダウンロードしてくださいC-ADBTP-2601試験準備
- 真実的なC-ADBTP-2601受験準備 - 合格スムーズC-ADBTP-2601資格取得講座 | 素敵なC-ADBTP-2601認定資格試験 ???? [ www.copyright.jp ]に移動し、➽ C-ADBTP-2601 ????を検索して無料でダウンロードしてくださいC-ADBTP-2601試験概要
- 更新するC-ADBTP-2601受験準備試験-試験の準備方法-効率的なC-ADBTP-2601資格取得講座 ???? 《 www.goshiken.com 》に移動し、➤ C-ADBTP-2601 ⮘を検索して無料でダウンロードしてくださいC-ADBTP-2601日本語版参考資料
- C-ADBTP-2601関連復習問題集 ???? C-ADBTP-2601トレーニング費用 ???? C-ADBTP-2601日本語pdf問題 ???? URL ✔ www.shikenpass.com ️✔️をコピーして開き、➤ C-ADBTP-2601 ⮘を検索して無料でダウンロードしてくださいC-ADBTP-2601専門知識訓練
- myportal.utt.edu.tt, myportal.utt.edu.tt, myportal.utt.edu.tt, myportal.utt.edu.tt, myportal.utt.edu.tt, myportal.utt.edu.tt, myportal.utt.edu.tt, myportal.utt.edu.tt, myportal.utt.edu.tt, myportal.utt.edu.tt, jaspertgax373562.hazeronwiki.com, socialmediaentry.com, www.fotor.com, jonasgwth931129.smblogsites.com, xanderbxai593519.celticwiki.com, pennypbir514120.nizarblog.com, binksites.com, lewiskpya946044.bloggazzo.com, singnalsocial.com, Disposable vapes